How to Measure Your Kitchen for Countertops: A Quick Guide for Homeowners
Getting a countertop quote does not have to feel complicated. If you are planning a kitchen remodel, updating an island, replacing old laminate, choosing new granite, comparing quartz colors, or trying to understand whether quartzite will fit your budget, the first thing a countertop fabricator needs is a basic layout. That layout does not need to be perfect. It does not need to be professionally drawn. It does not need to look like an architectural plan. In the beginning, it only needs to give enough information to understand the shape of the project, the approximate size of each countertop section, where the sink and appliances are located, and what material direction you are considering.
At Cutting Edge Stone Fabrication, homeowners reach out from Reading, Wyomissing, Berks County, Lancaster County, Lebanon County, Schuylkill County, Chester County, Montgomery County, Lehigh County, and nearby Pennsylvania areas with one common question: "What do you need from me to give me a price?" The answer is usually simple. A rough sketch, some basic measurements, a few photos, and a note about the material you like can get the conversation started quickly.
This guide explains how to measure your kitchen for countertops the right way for a ballpark estimate. It also explains what your measurements can and cannot do. Homeowner measurements are excellent for starting a quote, comparing material levels, and deciding whether a project is within your budget. They are not a replacement for a professional template. Before fabrication, a countertop company still needs to verify the final dimensions, cabinet conditions, appliance details, sink information, overhangs, seams, and support requirements. The goal of this guide is not to turn you into a fabricator. The goal is to help you give Cutting Edge enough information to respond faster and more accurately.
If you are just starting your kitchen project, do not wait until everything is perfect. Send what you have. Even a hand-drawn sketch on notebook paper can be enough to begin.
Why Measuring Correctly Matters
Countertop pricing is usually built around square footage, material selection, fabrication details, edge work, cutouts, sink type, installation requirements, and job complexity. The measurements are the starting point. If the measurements are missing, unclear, or way off, the estimate becomes harder to produce and less useful for you.
A good sketch helps a fabricator understand several things right away. It shows whether the kitchen is a straight run, L-shape, U-shape, galley, peninsula, island, or a more custom design. It shows how many separate countertop sections there are. It shows whether the project includes a sink, cooktop, range, dishwasher, waterfall panel, raised bar, full-height backsplash, or special overhang. It also gives the estimator a way to calculate approximate square footage and determine whether one slab, two slabs, or multiple slabs may be needed depending on the material.
This matters because two kitchens with the same square footage can price very differently. A simple straight run with one sink cutout is not the same as a kitchen with an oversized island, cooktop cutout, waterfall ends, mitered edges, full-height backsplash, and multiple seam decisions. Measuring is not only about the total number of square feet. It is about understanding the layout.
Clear measurements also save time. Instead of going back and forth for days asking for one missing dimension at a time, you can send one clean set of information and get the quoting process moving. For homeowners who are comparing granite, quartz, quartzite, marble, or porcelain, this is especially helpful. Once the basic layout is clear, Cutting Edge can often price the same kitchen in different material levels so you can compare options.
What You Need Before You Start
You do not need special tools to measure for a starting countertop quote. A few simple items are enough.
You will need a tape measure, paper, a pencil or pen, and your phone for photos. A calculator helps if you want to estimate square footage yourself, but you do not need to calculate everything perfectly before sending it over. If you have cabinet plans from a kitchen designer, builder, cabinet company, or contractor, even better. A cabinet layout is usually one of the best documents to send because it already shows walls, appliance locations, cabinet runs, and dimensions.
If you are measuring an existing kitchen, clear the counters enough that you can see the back wall, front edge, sink, stove, and ends of each run. You do not have to empty the whole kitchen, but you want to avoid guessing behind appliances or clutter. If you are measuring a new kitchen that has not been installed yet, use the cabinet layout or floor plan. If the cabinets are already installed, measure the actual cabinets because field conditions can vary.
Before you start, decide whether you are measuring the existing countertop or the cabinets. For a rough quote, either can be useful as long as you are consistent and you explain what you measured. If the old top is still in place and follows the same layout you want, measuring the existing countertop can be easy. If the layout is changing, measuring the cabinet runs or using cabinet plans is better.
Most important, do not stress over perfection. The first measurement is for estimating. The final professional template comes later.
The Golden Rule: Draw the Shape First
The biggest mistake homeowners make is measuring random sections without drawing the kitchen. Numbers by themselves are hard to understand. A list like "96, 36, 72, 25, 48" does not tell the fabricator which dimension belongs to which wall, where the sink goes, or whether a section connects to another section.
Start with a simple overhead sketch. Pretend you are looking down at your kitchen from above. Draw the walls. Draw each countertop run as a rectangle. Draw the island if you have one. Draw the peninsula if you have one. Draw the sink, range, cooktop, refrigerator, dishwasher, and any tall cabinets or pantry cabinets that stop the countertop.
Your sketch does not need to be to scale. It only needs to be understandable. Label each section with a letter, such as A, B, C, and D. Then write the measurements on the sketch next to each section. This makes it much easier for Cutting Edge to follow.
A good sketch answers these questions at a glance. Where are the walls? Where does each countertop start and stop? Where is the sink? Is the stove a slide-in range or a cooktop cutout? Is there an island? Is there a seating overhang? Are there exposed finished ends? Does the countertop turn a corner? Is there a backsplash? Are any sections separate from the main kitchen?
If you can answer those questions visually, your sketch is already useful.
Step 1: Measure the Length of Each Countertop Run
The first measurement is length. For each countertop section, measure from one end to the other in inches. Use inches because countertop square footage is commonly calculated by multiplying inches and then dividing by 144. Write the length directly on your sketch.
If the countertop runs along a wall, measure from wall to wall, wall to cabinet end, or cabinet end to cabinet end depending on the layout. If the counter stops at a refrigerator panel, tall pantry, range opening, or finished end, mark that on the drawing. If there is an inside corner, write the dimensions for each side of the corner rather than only giving the outside total.
For an L-shaped kitchen, measure each leg of the L. For a U-shaped kitchen, measure the back wall and both side walls. For a galley kitchen, measure each straight run separately. For an island, measure the full length of the island top. For a peninsula, measure the connected section and mark where it attaches to the wall or cabinets.
Do not round too much. If a wall is 97 1/2 inches, write 97 1/2 inches. For a ballpark estimate, being within an inch or two is usually workable, but writing the actual measurement is better. If you are unsure where one section ends and another begins, take a photo and mark it up on your phone. A marked-up photo can be very helpful.
Step 2: Measure the Depth of Each Section
Depth is the measurement from the back wall to the front edge of the countertop. Standard kitchen countertop depth is often estimated around 25 to 26 inches when the countertop covers standard 24-inch base cabinets and includes a front overhang. Some measurement guides use 26 inches as the standard depth for estimating. Actual depth can vary based on cabinets, wall conditions, overhang preference, backsplash, panels, and design details.
For each section, measure from the wall to the front edge if an existing countertop is in place. If you are measuring cabinets, measure the cabinet depth and note that it is cabinet depth, not final countertop depth. Most base cabinets are around 24 inches deep before countertop overhang, but do not assume everything is standard. Older homes, custom cabinetry, built-ins, and remodeling conditions can vary.
Islands are different. An island may be 36 inches deep, 42 inches deep, 48 inches deep, or larger depending on the design. Islands with seating may have a larger overhang on one side. If your island has seating, write down the cabinet box size and the desired overhang if you know it. For peninsulas, bars, desks, serving areas, coffee stations, butler's pantries, laundry rooms, and bathroom vanities, measure the depth separately. Do not assume every top in the project is the same depth.
Step 3: Mark the Sink, Range, Cooktop, and Appliances
The next step is marking what goes into or around the countertop. The sink location is especially important because sink cutouts affect fabrication, layout, polish work, and sometimes seam planning. On your sketch, draw a small rectangle or oval where the sink will be. Write whether the sink is undermount, drop-in, farmhouse, apron-front, or not yet selected.
If you already have the sink model, send the sink information, spec sheet, or a photo of the box label. If Cutting Edge is supplying the sink, say that. If the cabinet company or plumber is supplying it, say that. If you have not chosen a sink yet, that is okay, but it should be noted.
For cooking appliances, mark whether you have a freestanding range, slide-in range, cooktop cutout, rangetop, or separate wall oven. A range usually creates an opening between countertop sections. A cooktop usually requires a cutout in the stone. The fabricator may need the cooktop template or appliance specification before final fabrication.
Mark the dishwasher because it usually sits next to the sink and affects support, cabinet layout, and install planning. Mark the refrigerator if the countertop dies into a panel or if there is a countertop section beside it. Mark tall cabinets, pantry cabinets, and finished end panels. The more information you include, the cleaner the estimate process becomes.
Step 4: Measure Islands and Peninsulas Carefully
Islands and peninsulas are often the centerpiece of the kitchen, and they are also where measurement mistakes happen most often. Homeowners may measure only the cabinet box but forget the seating overhang. Or they may measure the full desired top but forget to explain that part of it is unsupported. For estimating, both pieces of information matter.
If you have an island, measure the length and depth of the cabinet base. Then measure or note the desired finished countertop size. If you do not know the finished size yet, write the cabinet size and say, "We would like seating overhang on one side." Cutting Edge can help you think through what is realistic.
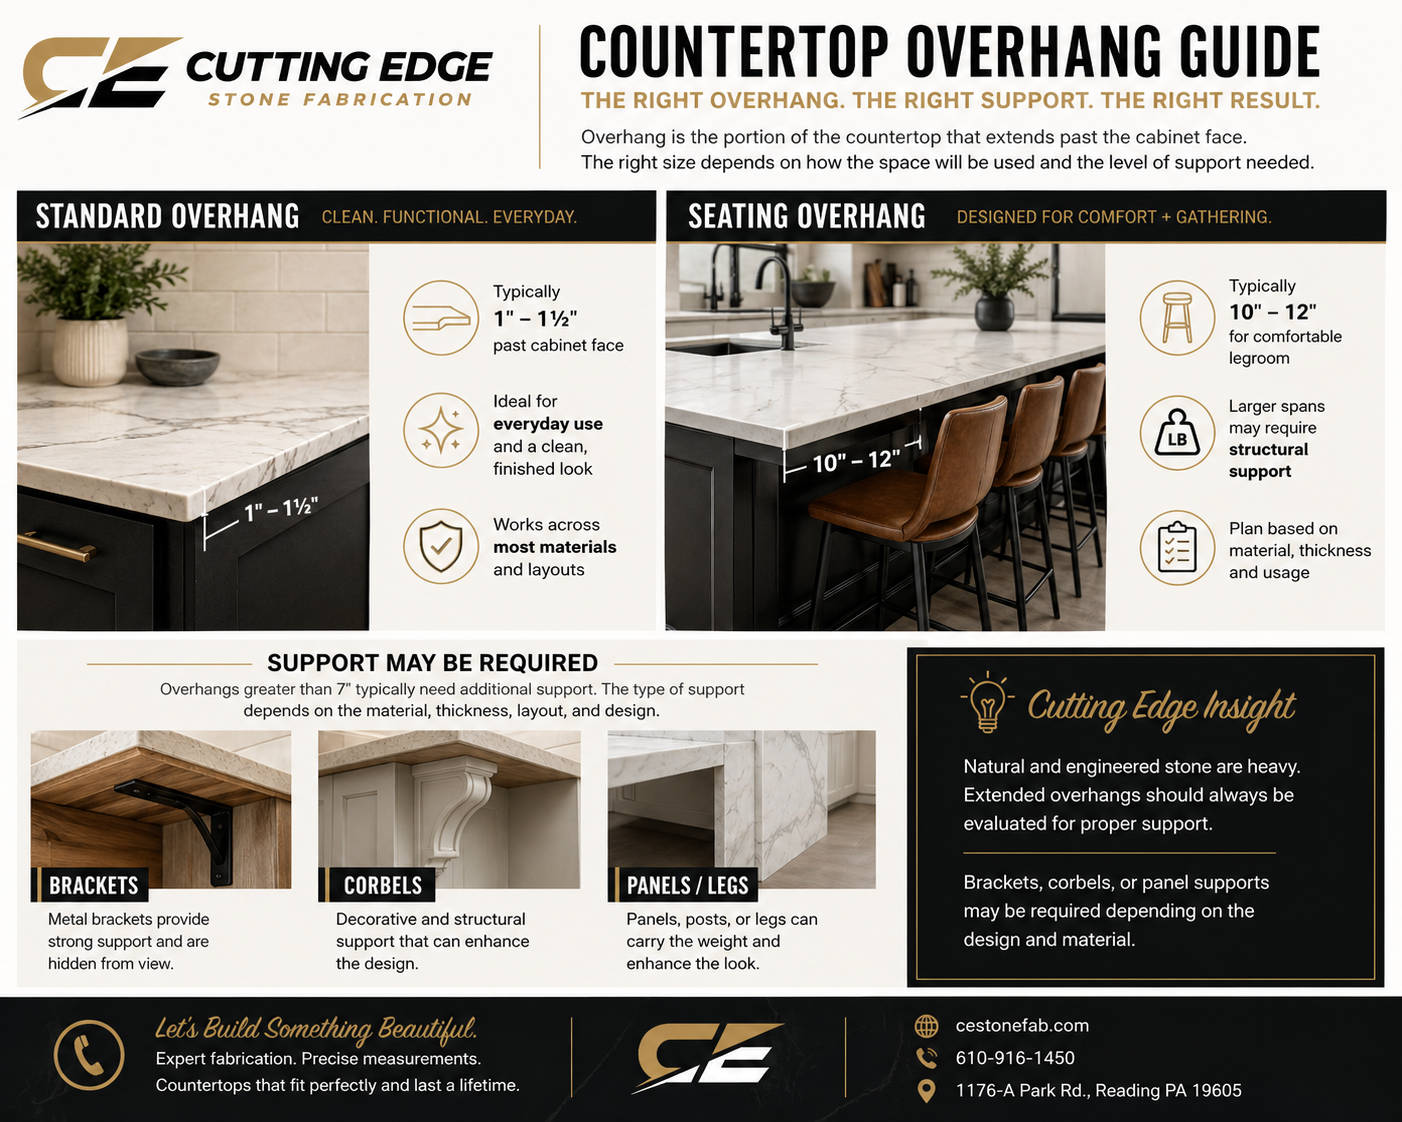
If you want stools at the island, mark which side will have seating. A small overhang for standing at a counter is very different from a deeper seating overhang. Larger overhangs may need brackets, posts, panels, corbels, or other support depending on the material, thickness, layout, and design. Natural stone and engineered stone are heavy, and support should be planned before fabrication.
If you want a waterfall island, where the countertop material continues down one or both sides of the island, mark that clearly. Waterfall panels affect slab usage, veining direction, seams, mitering, fabrication labor, and installation complexity. A waterfall island cannot be priced accurately if the estimator only sees the top surface measurement. For peninsulas, show where the peninsula connects and where the finished end is. Mark any seating overhang and any exposed sides.
Step 5: Note Backsplash Details
Backsplash can change the estimate. Some homeowners want no stone backsplash because they are installing tile. Others want a 4-inch stone backsplash. Others want full-height stone backsplash that goes from the countertop up to the cabinets or hood. Each option affects material, fabrication, install time, and design.
On your sketch, write one of the following: no stone backsplash, 4-inch backsplash, full-height backsplash, not sure yet. If you want full-height backsplash, photos are very helpful. The fabricator needs to understand wall cabinet locations, outlets, windows, hoods, shelves, and finished edges.
If you are keeping an existing tile backsplash, tell the fabricator. Removing or working around old backsplash can affect the installation process. If the backsplash is being replaced after the countertop, say that too. Countertop and tile timing should be coordinated so the finished kitchen looks clean.
For a ballpark quote, backsplash can be estimated separately. It is better to mention it early than to add it after the material has been selected.
Step 6: Measure or Note Overhangs
Overhang is the part of the countertop that extends past the cabinet. Standard front overhang is usually modest. Seating overhangs are larger. Overhangs at islands, peninsulas, raised bars, desks, and pass-through areas require more planning.
For a rough quote, mark where you want seating and write the desired overhang if you know it. If you do not know it, write "seating here" on the sketch. Cutting Edge can help recommend a practical size based on the layout and material.
Do not assume that any overhang is automatically safe without support. The appropriate support depends on the countertop material, thickness, overhang depth, cabinet structure, slab characteristics, seam locations, and use of the space. This is one reason final layout decisions should be confirmed by professionals before fabrication.
If you already have brackets, corbels, legs, panels, posts, or cabinet end supports planned, include that information. If a contractor or cabinet maker is building support, the countertop company should know early.
Step 7: Take Photos From Multiple Angles
Photos can answer questions that measurements do not. Take one wide photo of the entire kitchen from each corner if possible. Then take close-up photos of the sink area, stove area, island, corners, ends, and any unusual details. If you are replacing existing countertops, photos help the estimator understand the current layout. If you are starting from cabinet plans, send a photo of the space plus the drawings.
Good photos help identify wall conditions, appliance openings, backsplash situation, cabinet panels, windows, overhangs, and finished ends. They can also help catch details that homeowners forget to mention, such as a raised bar, desk area, angled cabinet, appliance garage, or small side counter.
When sending photos, do not send only close-ups. A beautiful close-up of a sink tells us the sink exists, but it does not show where it sits in the kitchen. Wide photos are often the most useful at the beginning.
How to Calculate Countertop Square Footage
If you want to estimate square footage yourself, use this simple formula:
Length in inches x depth in inches = square inches. Then divide by 144 to convert square inches to square feet.
For example, if one countertop section is 96 inches long and 26 inches deep, the math is 96 x 26 = 2,496 square inches. Then 2,496 divided by 144 = 17.33 square feet.
Repeat that for every section and add the sections together. If you have an island that is 84 inches by 42 inches, the math is 84 x 42 = 3,528 square inches. Then 3,528 divided by 144 = 24.5 square feet.
A simple estimate might look like this:
Section A: 96 x 26 = 17.33 square feet. Section B: 72 x 26 = 13 square feet. Island: 84 x 42 = 24.5 square feet. Total approximate square footage: 54.83 square feet.
For quoting, it is common to round up or allow room for waste, slab layout, seams, and fabrication realities. The square footage of the finished tops is not always the same as the amount of slab material needed. That is why the total you calculate at home should be treated as a starting point, not the final price.
Should You Subtract the Sink or Cooktop Cutout?
For a homeowner estimate, do not subtract the sink or cooktop cutout unless the fabricator specifically asks you to. This is a common mistake. People see an opening in the countertop and assume they should remove that area from the square footage. In many countertop estimates, cutouts still involve material handling, layout, cutting, polishing, reinforcement considerations, and fabrication work. The pricing method can vary by company and material, but for the purpose of sending a simple layout, it is usually better to provide the full countertop area and mark the cutouts clearly.
The same idea applies to small notches, appliance spaces, and corners. Do not try to over-edit the layout. Send the full shape and let the fabricator calculate it correctly.
Measuring an L-Shaped Kitchen
An L-shaped kitchen has two countertop runs that meet in a corner. Start by drawing the L shape. Mark the walls. Then measure the length of each leg of the L. Measure the depth of each leg. Mark the sink, dishwasher, range, refrigerator, and any end panels.
One challenge with L-shaped kitchens is the corner. If you only give one long measurement and one short measurement without showing the direction, it can be confusing. Label the long wall as Section A and the side wall as Section B. Write the measurements on each section. If one side dies into a refrigerator panel or tall cabinet, mark that.
Take a photo of the corner. Corners can include angled cabinets, blind corners, lazy Susan cabinets, or standard square corners. For a ballpark quote, the sketch is enough. For final fabrication, the template will capture the true field measurements.
If you want to upgrade from an old countertop to quartz or natural stone, do not assume the old seam placement is the best seam placement. A fabricator may recommend a different seam based on slab size, material pattern, sink location, access, or installation safety.
Measuring a U-Shaped Kitchen
A U-shaped kitchen has three connected sides. Draw the U shape from above. Measure the back wall and both side walls. Mark where each section starts and stops. Note any appliances that break the run, such as a range, dishwasher, or refrigerator panel.
U-shaped kitchens often have more seam-planning decisions because the countertop wraps around two corners. They also tend to have more wall variation, especially in older homes. A wall may not be perfectly square, and the final professional template is important.
For the first quote, do not worry about trying to solve seam placement yourself. Just provide the dimensions and photos. Cutting Edge can review the layout and explain what might make sense based on the material you choose.
Measuring a Galley Kitchen
A galley kitchen usually has two straight runs facing each other. Measure each run separately. Mark the sink side and the range side. Note where the refrigerator is located. If one side includes a tall cabinet or pantry, mark it. If one side has a shorter counter or a landing area, include it.
Galley kitchens can be straightforward to estimate, but details still matter. A sink cutout, range opening, finished exposed ends, backsplash, and wall conditions can all affect the final work.
Take photos from each end of the galley so the fabricator can see both runs clearly.
Measuring an Island
For an island, measure the overall length and depth. Then mark whether the dimensions are cabinet dimensions or desired countertop dimensions. This distinction matters.
If the cabinet base is 72 inches by 36 inches, the finished top may be larger because of overhang. If there is seating on one side, the top may be significantly deeper than the cabinet. If the island includes a sink, cooktop, outlets, waterfall panels, or decorative legs, mark those.
If the island is oversized, material selection becomes especially important. Large islands may require specific slab sizes, careful seam planning, or a different layout approach depending on the stone. Some materials have more dramatic veining, and the way the slab is positioned can dramatically affect the finished look.
If the island is the centerpiece of the kitchen, consider visiting the slab yard in person. A small sample will not show the full movement of granite, quartzite, marble, or many veined quartz designs.
Measuring a Peninsula
A peninsula is connected to the kitchen on one end and projects outward. Measure the connected run and the projecting section. Mark the finished end, the seating side, and any desired overhang. If the peninsula has a raised bar or two-level counter, draw both levels separately.
Peninsulas often need support planning. If people will sit at the peninsula, the overhang must be considered. If the end is exposed, finished edge details matter. If the peninsula connects near a wall or cabinet, access and installation path may matter too.
Again, a rough sketch is enough to begin. The final details can be handled through template and design review.
What Information to Send with Your Measurements
When you contact Cutting Edge for a quote, the best package includes five things: a sketch, dimensions, photos, material preference, and contact information.
The sketch should show the layout from above. The dimensions should be written in inches on each section. The photos should show the full kitchen and important details. The material preference can be as simple as "white quartz," "granite," "quartzite with movement," "something affordable," or "not sure yet." Your contact information should include your name, phone number, email, project address or town, and timeline.
If you already have cabinet plans, appliance specs, sink model, inspiration photos, or a material name, send those too. More information helps, but do not let missing details stop you from starting.
Here is a simple message you can send:
"Hi, I am interested in getting a countertop estimate. I attached a rough sketch, measurements, and photos. We are considering quartz or granite, but we are open to options. The project is in [town]. Please let me know if you need anything else or if we should stop into the showroom."
That kind of message gives the estimator enough to start a real conversation.
What Homeowner Measurements Are Good For
Homeowner measurements are very useful for early planning. They help estimate square footage, compare material levels, understand rough budget, identify layout complexity, and decide whether a project should move forward. They are especially helpful when a homeowner is not ready for an in-home visit yet or wants to understand ballpark pricing before selecting a final slab.
They also help you shop smarter. If you know your kitchen is approximately 45 square feet, you can compare granite, quartz, quartzite, and porcelain options more realistically. If you know your island is oversized, you can ask about slab sizes and seam possibilities early. If you know you want full-height backsplash, you can plan for it before the quote changes later.
For Cutting Edge, rough measurements make the first conversation much more productive. Instead of spending time just figuring out the shape, the estimator can help guide you toward colors, materials, timeline, and next steps.
What Homeowner Measurements Are Not Good For
Homeowner measurements are not final fabrication measurements. They should not be used to cut stone. A professional template is still required before fabrication. Final template measurements account for wall conditions, cabinet levelness, cabinet squareness, appliance openings, sink details, overhangs, finished edges, seam locations, support requirements, and field conditions.
Even a careful homeowner can miss things. Walls are not always straight. Corners are not always square. Cabinets are not always level. Appliances may need specific clearances. A sink may require a different cutout than expected. A backsplash decision may change the finished size. An island overhang may require support. A seam may need to move because of slab size or veining.
This is why the best process is simple: use homeowner measurements to get started, then rely on professional templating before anything is fabricated.
Common Measuring Mistakes to Avoid
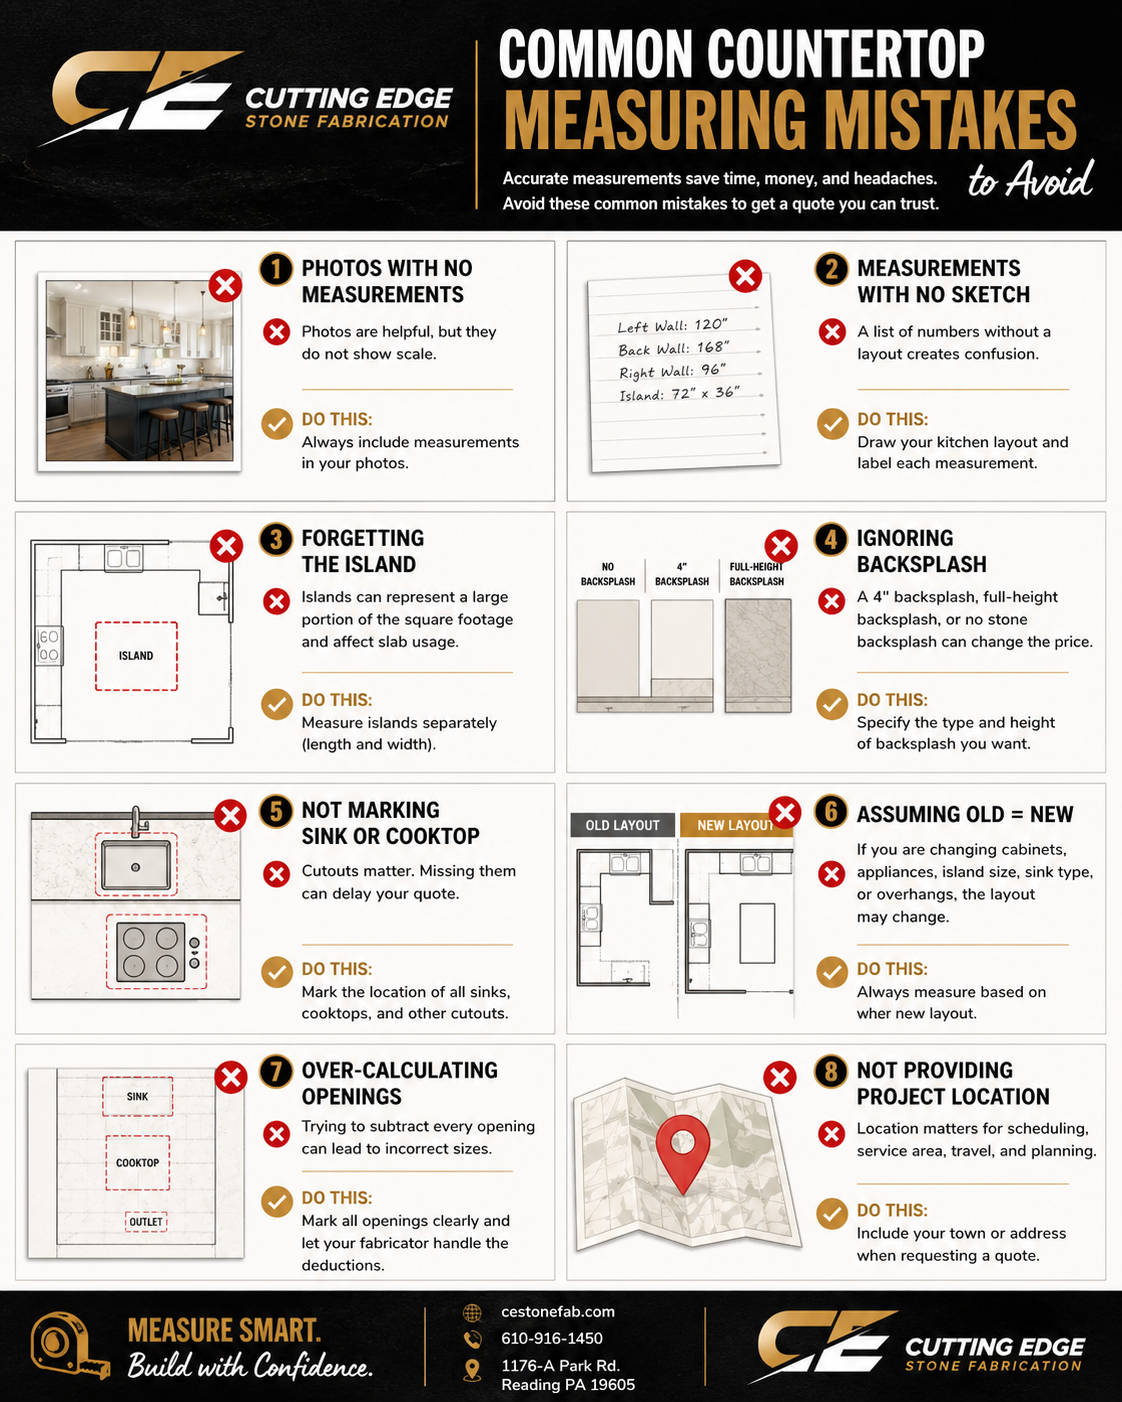
The first common mistake is sending photos with no measurements. Photos are helpful, but they do not show scale. A photo can make a small kitchen look large or a large kitchen look compact. Always include measurements if you can.
The second mistake is sending measurements with no sketch. A list of numbers without a layout creates confusion. Draw the kitchen shape and place the numbers where they belong.
The third mistake is forgetting the island. Islands can represent a large portion of the square footage and often affect slab usage. Measure them separately.
The fourth mistake is forgetting the backsplash. A 4-inch backsplash, full-height backsplash, or no stone backsplash can change the price. Mention it early.
The fifth mistake is not marking the sink or cooktop. Cutouts matter. Mark them on the sketch even if you do not have the exact model yet.
The sixth mistake is assuming the old countertop size is automatically the new countertop size. If you are changing cabinets, appliances, island size, sink type, or overhangs, the layout may change.
The seventh mistake is trying to subtract every opening. For a rough quote, mark openings clearly and let the fabricator calculate the job.
The eighth mistake is not mentioning the project location. Location matters for scheduling, service area, travel, and planning. Include your town or address when requesting a quote.
How Measuring Helps You Choose Materials
Once the approximate size of the project is clear, material selection becomes much easier. A small vanity, laundry top, or bar area may work well with many material options and even smaller pieces. A large kitchen with an oversized island may require more careful slab selection. A dramatic quartzite or marble-look quartz may need extra planning to make the movement look right across the island and perimeter.
Granite is a strong choice for homeowners who want natural variation and durability. Quartz is popular for low maintenance and consistent designs. Quartzite is a premium natural stone option for homeowners who want movement, depth, and a high-end look. Marble is beautiful but requires more care and realistic expectations. Porcelain can be a modern option for certain designs, especially when a sleek look is desired.
Measurements do not choose the material for you, but they help reveal what is practical. A specific island size might require a larger slab. A full-height backsplash might make vein direction more important. A kitchen with many separate pieces may use material differently than one large island.
This is why the best estimates combine both measurements and material direction.
Why Seeing Slabs in Person Still Matters
Measurements tell you how much material you may need, but they do not tell you how the material will look in your home. This is especially true with natural stone. Granite, quartzite, and marble can vary dramatically from slab to slab. Even quartz designs with veining can look different on a small sample compared to a full installed kitchen.
If you are choosing a simple solid or subtle quartz, samples may get you close. If you are choosing a material with movement, depth, color variation, or dramatic veining, seeing a slab in person is extremely important. A small sample might show a white background, but the full slab may include strong gold, gray, brown, green, or black movement. That movement can be beautiful, but you should see it before committing.
For homeowners in Berks County and surrounding counties, visiting a showroom or slab yard can save a lot of uncertainty. You can compare materials, see full slabs, look at edge options, discuss sink choices, and ask questions about maintenance and installation.
The Role of Professional Templating
Professional templating is the step that turns a rough idea into fabrication-ready information. During template, the countertop company verifies the actual field dimensions and collects the details needed to cut the stone correctly. This may include exact wall angles, cabinet conditions, overhangs, appliance openings, sink placement, seam planning, finished edges, radius corners, and other details.
For many projects, cabinets need to be installed before final template. They should be secure, level, and ready for countertop measurement. Appliances, sinks, faucets, and cooktops should be selected or available with specification sheets. If something is missing at template, it can delay the process.
The template is also the right time to confirm important design details. How much overhang do you want? Which edge profile did you choose? Where will the seam go? Is the sink centered on the cabinet or window? Is the island seating side correct? Are there any support concerns? Are there wall conditions that need to be addressed?
A good template protects both the homeowner and the fabricator. It reduces surprises and gives the fabrication team the information they need.
Countertop Measuring Checklist
Before you send your measurements, review this checklist.
Did you draw the kitchen from above? Did you label each countertop section? Did you measure length and depth in inches? Did you include the island or peninsula? Did you mark the sink location? Did you mark the range or cooktop? Did you mark the dishwasher and refrigerator area? Did you mention backsplash? Did you mark seating overhangs? Did you take wide photos? Did you include your town and timeline? Did you say what material you are interested in?
If the answer is yes to most of these, you are ready to send it.
If the answer is no, do not worry. Send what you have and ask for guidance. Cutting Edge can tell you what is missing.
Example: Simple Straight Kitchen Run
Imagine you have one straight countertop run along a wall. The run is 120 inches long and 26 inches deep. There is one undermount sink in the middle and a dishwasher to the right.
Your sketch would show one rectangle labeled Section A. You would write 120 inches along the length and 26 inches along the depth. You would draw the sink and label it "undermount sink." You would mark the dishwasher location. You would take a wide photo of the run and a close-up photo of the sink area.
The square footage estimate would be 120 x 26 = 3,120 square inches. Divide by 144 and the section is about 21.67 square feet.
That is enough to start a quote conversation.
Example: L-Shaped Kitchen with Island
Imagine an L-shaped kitchen with one wall at 108 inches, another wall at 84 inches, and a separate island that is 72 inches by 42 inches. The sink is on the long wall. The range is on the short wall. The island has seating on one side.
Your sketch would show Section A as the 108-inch wall, Section B as the 84-inch wall, and Section C as the island. You would write the depths for each section. You would mark the sink, range, dishwasher, island seating side, and any backsplash plans. You would take photos from several angles.
The estimate would use each section separately. The island should not be forgotten because it may be a major part of the material usage and a major visual feature.
Example: U-Shaped Kitchen with Cooktop
Imagine a U-shaped kitchen with three connected runs. The back wall is 120 inches. The left side is 96 inches. The right side is 72 inches. There is a cooktop cutout on one side and a sink on the back wall.
Your sketch should show all three sides of the U. Write each length. Mark the sink, cooktop, dishwasher, appliance openings, and any finished ends. If there is a full-height backsplash behind the cooktop, note that separately.
Because U-shaped kitchens have multiple corners, the final professional template is especially important. However, the rough measurements are still very useful for estimating.
How Cutting Edge Uses Your Sketch
When you send a sketch to Cutting Edge Stone Fabrication, it helps the team understand the project quickly. The estimator can review square footage, material options, possible slab requirements, sink and cooktop details, backsplash needs, and installation complexity. If something is unclear, the team can ask targeted questions instead of starting from zero.
A sketch also helps when pricing several material options. For example, Cutting Edge may be able to give you different pricing levels for quartz, granite, or quartzite based on the same layout. This helps you compare value without constantly re-explaining the project.
If the sketch shows a potential issue, such as an oversized unsupported overhang or a missing appliance detail, it can be discussed early. Early planning is always better than last-minute changes.
Measuring for Bathrooms, Bars, Laundry Rooms, and Other Areas
This guide focuses on kitchens, but the same basic process works for bathroom vanities, laundry rooms, wet bars, coffee bars, fireplace hearths, desks, and other countertop areas. Draw the shape, measure length and depth, mark sinks or appliances, note backsplash, and take photos.
Bathroom vanities often require sink details, faucet spread, side splashes, and wall conditions. Laundry rooms may require clearance around washers and dryers. Bars may involve overhangs, finished ends, or raised areas. Outdoor areas may require special material considerations and support planning.
If your project includes multiple rooms, label each room separately. For example: Kitchen Section A, Kitchen Island, Laundry Room, Primary Bath, Powder Room. This keeps the estimate organized.
Measuring New Construction or Cabinet Plans
If your cabinets are not installed yet, use your cabinet drawings. Send the full plan, elevations if available, appliance specs, and notes about material preferences. Cabinet plans are very helpful because they often show dimensions, appliance openings, sink base size, island layout, and finished panels.
However, cabinet plans are still not a replacement for template after installation. Sometimes field conditions differ from the drawings. A wall may shift. Cabinets may be adjusted. A filler may change. An appliance model may change. The final template confirms the real installed conditions.
If you are working with a kitchen manufacturer, contractor, builder, or designer, Cutting Edge can often coordinate with them. This can make the process smoother and reduce missed details.
Measuring Replacement Countertops
If you are replacing existing countertops and keeping the same cabinet layout, measuring the existing top can be a good starting point. Measure each section from edge to edge and wall to front. Mark sink, range, cooktop, backsplash, and finished sides. Take photos of the existing top, especially seams, corners, and appliance areas.
If you are changing the sink, changing from a drop-in sink to an undermount sink, adding an overhang, removing a raised bar, changing appliances, or modifying cabinets, mention that. Those changes can affect the quote.
Replacement projects also need planning around removal. If Cutting Edge is removing the old tops, that should be included in the conversation. If a contractor is removing them, timing should be coordinated. Plumbing and appliance disconnects may also need to be handled before installation.
Measuring for Full-Height Backsplash
Full-height stone backsplash can create a beautiful, high-end look, but it requires more information than a 4-inch backsplash. If you are considering it, take straight-on photos of the walls where the backsplash will go. Mark the height from countertop to upper cabinets, hood, shelves, or ceiling depending on the design. Note outlets, switches, windows, pot fillers, and other wall details.
Full-height backsplash may require additional slabs or careful layout from the same slab family. If the countertop has dramatic veining, some homeowners want the backsplash to match or continue the movement. This can be stunning, but it requires planning.
For a rough quote, say "price full-height backsplash separately" or "we are considering full-height backsplash behind the range." That gives Cutting Edge a chance to include it as an option.
Measuring for Waterfall Panels
Waterfall panels are vertical stone panels that continue down the side of an island or countertop. They are popular in modern and high-end kitchens. They also affect material usage and fabrication more than many homeowners realize.
If you want a waterfall, mark which side or sides of the island will waterfall. Measure the island top and the height from the top of the cabinet or finished floor area where the panel will land. Photos are very helpful. If the flooring is not installed or cabinet panels are not finished, note that.
Waterfall panels often involve mitered edges and careful vein layout. The price is not just the square footage of the panel. It includes fabrication complexity, layout planning, and installation precision. Marking waterfall panels early avoids surprises.
Measuring for Seating Overhang
If you want seating at an island or peninsula, mark the seating side clearly. Write the desired overhang if known. If you are not sure what overhang makes sense, say that. The fabricator can help explain options.
Seating overhang affects comfort and support. Too little overhang may make seating uncomfortable. Too much overhang without support can create a structural concern. Brackets, legs, panels, posts, or corbels may be needed depending on the design.
Do not wait until after the countertop is fabricated to think about seating support. It should be part of the plan from the beginning.
How to Make Your Sketch Easy to Read
Keep the sketch simple. Use a dark pen if you are taking a photo of paper. Write large enough that the numbers can be read. Label each section. Put arrows to show length and depth. Mark walls with the word "wall." Mark appliances with simple labels like sink, DW, range, fridge, cooktop. Mark island seating with the word "stools" or "seating."
If you make a mistake, cross it out clearly or redraw the sketch. A clean sketch is easier to quote than a cluttered one. If you prefer digital tools, you can mark up a photo, use a notes app, or use any simple drawing app. The format does not matter as long as the information is clear.
When sending the sketch by text or email, make sure the image is not blurry. Take the photo in good light and crop out unnecessary background.
Who This Guide Is For
This guide is for homeowners throughout Berks County and surrounding areas who are planning new countertops and want a faster, clearer way to start the quote process. Cutting Edge Stone Fabrication works with homeowners, contractors, builders, kitchen companies, remodelers, and designers across the region.
If you are searching for countertop measurements in Reading, PA, quartz countertops in Wyomissing, granite countertop estimates in Berks County, quartzite countertops near Lancaster County, kitchen countertop fabricators near Lebanon County, stone countertops near Schuylkill County, countertop installation near Chester County, countertop shops near Montgomery County, or slab yard options near Lehigh County, the measuring process starts the same way. A clear sketch and photos help move the estimate forward.
Local homeowners often want to know whether they should visit the showroom first or send a layout first. Either is fine. If you already have drawings, send them. If you want to see material first, visit the showroom or slab yard. If you are not sure where to begin, send photos and ask what measurements are needed.
Why a Local Fabricator Can Help Early in the Process
A local fabricator can look at your layout and help you understand practical details before you get too far into the project. That may include whether your island size works with the material you like, whether a seam might be needed, whether a sink selection affects the quote, whether your backsplash plan should be priced separately, or whether a seating overhang needs support.
This type of guidance is valuable because countertops are not just a product. They are measured, fabricated, transported, and installed for your specific space. The more custom the layout, the more important early guidance becomes. For homeowners in and around Berks County, being able to speak with a local team, visit materials in person, and coordinate with local contractors can make the process smoother.
Final Before-You-Send Checklist
Before you send your layout, make sure you include the following:
Your name and best contact information. The town or project location. A rough sketch with each section labeled. Length and depth measurements in inches. Photos of the full kitchen. Close-up photos of sink, stove, island, corners, and unusual areas. Sink type or sink model if known. Appliance type or cooktop/range information if known. Backsplash preference. Seating overhang preference. Material preference or inspiration photos. Your project timeline.
If you do not have every item, send what you have. A starting conversation is better than waiting weeks because one detail is missing.
Frequently Asked Questions
Do my measurements need to be perfect?
No. Your measurements are for a ballpark quote. They should be close enough to understand the project, but they do not replace a professional template.
Should I measure in feet or inches?
Inches are usually best. Countertop square footage is commonly calculated by multiplying length by depth in inches and dividing by 144.
Should I measure the cabinets or the old countertop?
For a rough quote, either can help. If the layout is staying the same, the old countertop is often easy to measure. If the layout is changing or cabinets are new, cabinet plans or cabinet measurements are better. Just tell Cutting Edge what you measured.
Do I subtract the sink cutout?
Usually no. Mark the sink clearly on the sketch and let the fabricator calculate the estimate correctly.
What if I do not have a sink picked yet?
That is okay for an early estimate. Write “sink not selected yet” and explain whether you are thinking undermount, farmhouse, or drop-in if you know.
What if I only have cabinet drawings?
Send them. Cabinet drawings are very helpful for early pricing. Final measurements still need to be verified after cabinets are installed.
Can Cutting Edge price several materials from the same sketch?
Yes. A clear layout makes it easier to compare different material options such as granite, quartz, quartzite, marble, or porcelain.
Do I need to visit the showroom before getting a quote?
Not always. You can send a sketch first for a ballpark quote. Visiting the showroom or slab yard is still highly recommended before final material selection. What if I have no idea what material I want? Send the layout anyway. You can say you are open to options. Cutting Edge can help guide you based on budget, style, durability, and maintenance preferences.
When does the professional template happen?
Template usually happens after the cabinets are installed and the project details are ready to verify. The exact timing depends on the job, material, sink, appliances, and schedule.
We Do A Marvelous Job!
Ready for a Countertop Quote?
If you are planning new countertops in Reading, Wyomissing, Berks County, Lancaster County, Lebanon County, Schuylkill County, Chester County, Montgomery County, Lehigh County, or a nearby Pennsylvania area, Cutting Edge Stone Fabrication can help you get started.
Send us a rough sketch, measurements, photos, and any material ideas you have. We can review your layout, help you understand your options, and guide you toward the right next step. Whether you are considering granite, quartz, quartzite, marble, or porcelain, a simple sketch is often all it takes to begin.
You do not need a perfect drawing. You just need to start.